FTP Server
How to Set up Your Own FTP Server in an Easy Way by QNAP Turbo Station :
FTP Server: A convenient way to share and exchange large files
We may all have the same experience that when sending files at work or submitting homework, a single file is often larger than 10MB which is difficult to be sent via e-mail, not to say sending video or artwork files that are over hundreds of MB in size. If you have your own FTP server at home or at work, you can manage the access authority of the server, and share your files with customers or friends easily.
The difficulties of setting up an FTP server by PC
It is a challenging job for non IT professionals to set up an FTP server.
- Regarding the hardware, you have to prepare a PC as an FTP server. Then install the OS and software in the PC, connect it to the LAN and turn on the PC 24×7 (if you want the FTP server to run 24 hours).
- Regarding the software, if you are using Windows OS, you can select some popular FTP server software, e.g. Server-U. However, you will have to pay for the software and spend some time to install and learn the configuration and operation of the software. If you prefer a more stable and cheaper choice, you can install Linux OS on your PC and use the FTP server utility of Linux.
The defects of the above method are:
- The noise of the PC fan is very loud, the PC temperature is high and it is energy-consuming. The cost of running the server 24×7 can be very high. These are all unfavorable to small office and home users.
- For non-professional computer users, it is difficult and time-consuming to understand Linux and set up an FTP server on their own.
The new choice for home and SOHO users-QNAP Turbo Station
QNAP Turbo Station provides a new choice for users. Turbo Station is built-in with FTP server function. After installing Turbo Station, you can enable FTP server via the web management interface and configure the settings. The configurations are very simple that general users can set up the server easily.
The advantages of setting up an FTP server by Turbo Station are as below:
- Simple activation: The FTP server of Turbo Station can be enabled by a single click. No extra software is necessary.
- Simple web management interface: User management, data sharing authority and other settings of Turbo Station can be completed easily via the web browser.
- Stable and energy-saving: Turbo Station adopts embedded hardware design which is stable and energy-saving. The power consumption is about 15~25W. (14.4W for 1-bay NAS) Compared to a PC server, Turbo Station helps you save electricity expense in a large extent.
- Silent: Turbo Station uses aluminum alloy case for heat dissipation and adopts fanless design which is absolutely quiet to use. You can turn on the server for 24 hours and the server will not generate any noise to disturb your work or rest.
- Small-sized, occupies small space only. It is easy for you to place it anywhere.
How to configure:
A. Set up Turbo Station in a few simple steps
- Install a hard disk to Turbo Station and finish initialization according to the Quick Installation Guide.
- Make sure you have connected a PC and Turbo Station to the same LAN. Execute QNAP Finder (the configuration utility provided by QNAP) to find your QNAP Turbo Station in LAN to enter Turbo Station’s web administration page.
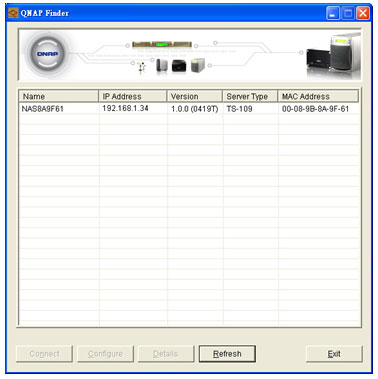
The server will pop up a window and prompt for user name and password.
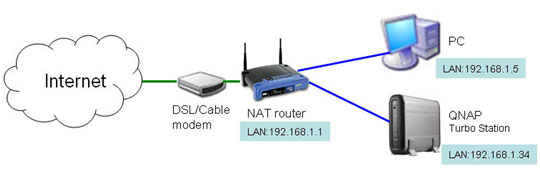
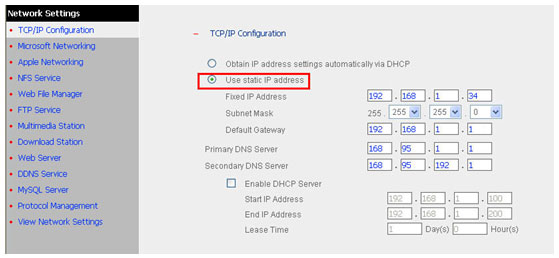
(TS-109 and TS-209’s default user name: admin, password: admin). - It is recommended to assign a fixed IP to Turbo Station. (Since you may need to open the ports of some services on your NAT router and forward them to the fixed IP address of Turbo Station.) Go to Network Settings>TCP/IP Configuration. If your gateway address is 192.168.1.1, you can assign a fixed IP to Turbo Station, e.g. 192.168.1.34, and set the subnet mask as 255.255.255.0. Note that the LAN IP of Turbo Station should be in the same LAN of the NAT router.
B. Finish the IP sharing router settings (DDNS and port forwarding settings)
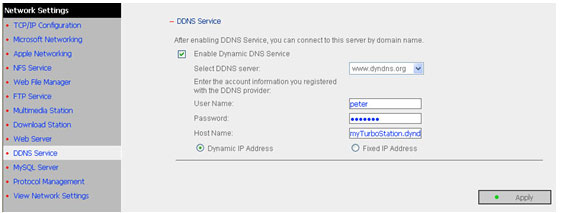
- DDNS (Users using fixed IP for Internet connection might not need this service)
Most ISP will provide one or more dynamic public IP for Internet connection. (This applies to the situation that the IP sharing router acquires WAN IP from ISP by PPPoE or DHCP connection.) To set up a server, a fixed IP address or URL is necessary so that users can easily recall the server address to connect to. When a dynamic IP address is used, you can use a DDNS supported IP sharing router with Turbo Station or use Turbo Station’s DDNS function, and register an easy-to-remember address from DDNS provider to identify Turbo Station on the Internet, e.g. myTurboStation.dyndns.org.
If you are using your Turbo Station without being behind an NAT router, you can also configure to use the DDNS function on Turbo Station.
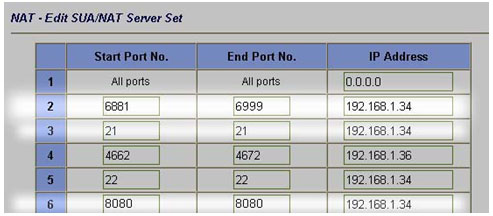
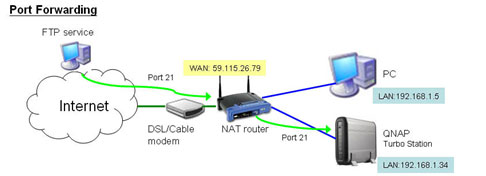
- Port Forwarding
If your Turbo Station is located behind the NAT router, you need to open the ports of some services on the NAT router and forward these ports to the fixed LAN IP of Turbo Station. This function is available on most routers in the market and is often known as “Port Forwarding“, “NAT Server” or “Virtual Server“. Take FTP server as an example, you have to forward port 21 to the LAN IP of Turbo Station, e.g. forward port 21 to 192.168.1.34. When your NAT router receives external port 21 packets (the FTP port is 21) at WAN side, the router will forward these packets to the LAN IP of Turbo Station. Moreover, to connect to the Turbo Station at home from WAN, you can simply open port 8080 (the management port, or port 6000 of TS-101, TS-201, or TS-100) and forward the port to the LAN IP of Turbo Station.
PS: Some NAT routers provide DMZ settings. You can forward LAN IP address specified by DMZ to Turbo Station. When this setting is used, all ports from WAN to LAN will be forwarded to Turbo Station.
After completing these two settings, you can connect to the FTP server at home from the Internet via ftp://myTurboStation.dyndns.org to upload and download files.
C. Step-by-step configuration of FTP server
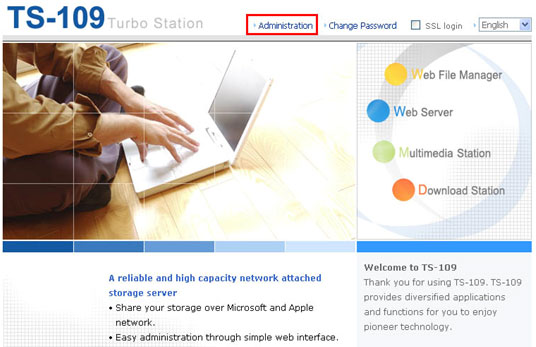
- Enter the administration page of Turbo Station:
? Click Administration to enter the administration page. The server will pop up a window to prompt for user name and password. (Default user name of TS-109 and TS-209: admin, password: admin).
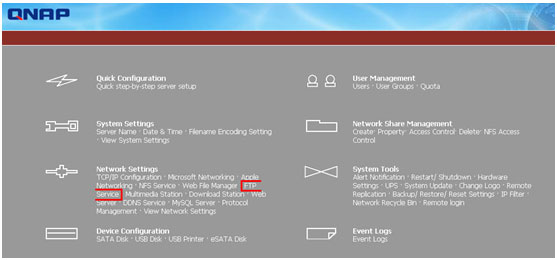
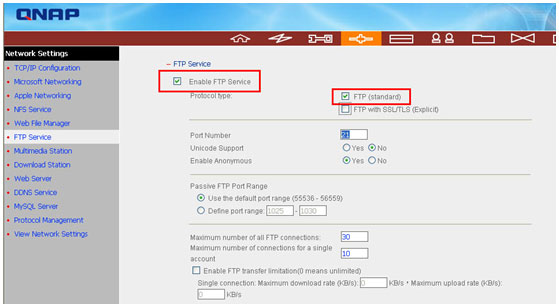
- Enable FTP service
? Go to FTP Service in Network settings.
? Check the box “Enable FTP Service”. You can change the FTP port or use the default port 21. You can also set the maximum number of connections, and configure Unicode support and anonymous login settings. After configuration, click Apply and FTP service is enabled successfully.
- Configure user and folder access right
The access right of the FTP server of Turbo Station is consistent to the folder access right of network share folders on Turbo Station configured in Network Share Management. Therefore, after you configure the user account and folder access right of Turbo Station, you can use the same user account and password to connect to the FTP server of Turbo Station.
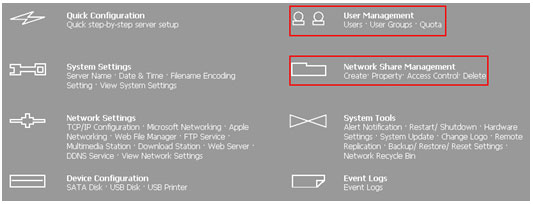
? You can go to User Management page to create or delete user accounts and change the login password.
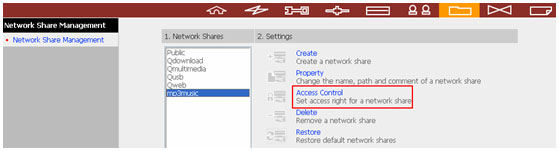
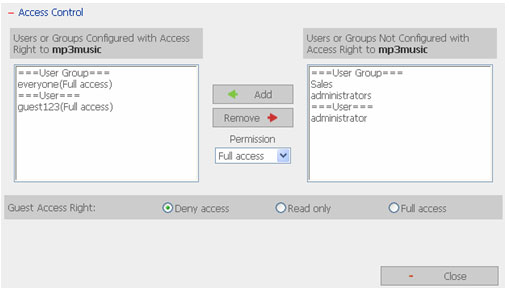
? You can go to Network Share Management to create a share folder and define the folder access right (including full access, read only and deny access).In the following example, we added an account guest123. Then we created a folder mp3music in Network Share Management and configured the access right to allow guest123 to access the folder mp3music. After successful configuration, users can use the account of guest123 and the password to connect to the FTP server and read/write the files in mp3music folder.
- Test FTP connection
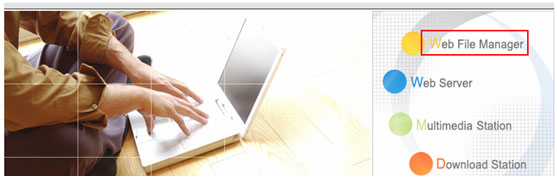
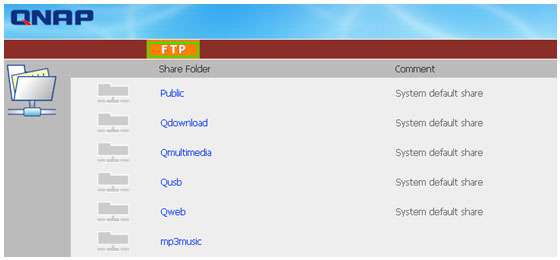
? In LAN connection, you can login Web File Manager of Turbo Station and click FTP to access the FTP server.
? You can also enter ftp://username:password@Turbo Station IP_address/ directly in the web browser, e.g. ftp://admin:admin@192.168.1.34 to connect to the FTP server.
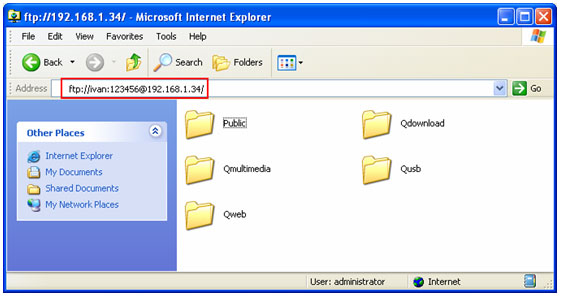
? When you are connecting to the FTP server in LAN from the Internet, you have to enter your WAN IP address or DDNS name as the IP address, e.g. ftp://ivan:123456@telecomkid.dyndns.org.
? You can also use some famous FTP client software, e.g. CuteFTP or FileZilla for FTP service.
When you have completed FTP server configuration, you only have to remember the IP address or URL of Turbo Station, the user name and password to access the server via FTP for file uploading and downloading. You can also share any data, video and music with your customers and friends via FTP.
Conclusion
FTP server is one of the convenient functions of QNAP Turbo Station. FTP server can be set up by Turbo Station. The web-based configuration is simple and fast to complete. Establishing an FTP server can now be done by anyone. It is no longer a complicated task that can only be completed by IT professionals. Moreover, Turbo Station’s energy-saving, fanless, and aluminum alloy case design enable absolutely silent and stable performance. It is an ideal choice for home and small office.