Server System Setup
How to Set up Server System for Your Small-sized Business by QNAP Turbo Station :
It is common for all schools and departments of enterprises to set up a file server on the network for all members to share files and back up data. Generally, each department will employ an IT professional to finish server setup which involves purchasing computer hardware, hardware, OS and software installation, and assigning data access right for every user etc.
However, setting up a server system is difficult for SOHO and small-sized business users. There are a few difficulties:
- Lack of professional IT staff in SOHO or small-sized business: To set up a server alone is a challenging job to most non-IT users. They have to understand Linux, software installation and configuration thoroughly in a short period. In addition, server maintenance is difficult that it involves creating account, setting authority, creating folders etc. These jobs all need IT professionals to complete.
- Limited space: SOHO or small-sized business users do not have their own server room and their office space is limited. PC will occupy office space. The server has to be located in server room or the loud noise will disturb the users.
- Absence of file backup mechanism: File server is generally used for saving files and data sharing; while useful tools are absent, it is seldom used for backup. If the computers of the staff are lost or the file system crashes, huge loss will be induced and much time will be spent to compensate the loss.
Quick setup of highly cost-effective server by Turbo Station
Turbo Station is a NAS server with many embedded powerful functions. It is both a file server and a backup server. To manipulate the functions of Turbo Station, you can use the Web server to publish company website and enable FTP service to set up a file sharing center. Moreover, Turbo Station can further let you back up important data from remote location.
In this article, we will demonstrate how a non-IT user sets up a multi-functional server in a small office on his own.
The benefits of Turbo Station as a file server:
- Simple activation: File Server, Backup Server, folder creation and access authority etc. are the embedded functions of Turbo Station. There is no need to install other software which is very convenient for non-professional users.
- Simple web management interface: User management, data sharing authority and other settings of Turbo Station can be completed easily via the web browser.
- Convenient and powerful backup software – NetBak Replicator: It is a powerful software for you to perform schedule or real-time backup to Turbo Station.
- Support remote data backup: Data on Turbo Station can be backed up to a remote Turbo Station by simple configuration.
- Stable and energy-saving: Turbo Station adopts embedded hardware design which is stable and energy-saving. The power consumption is about 15~25W. (Only 14.4W for 1-bay NAS) Compared to a PC server, Turbo Station helps you save electricity expense in a large extent.
- Silent: Turbo Station uses aluminum alloy case for heat dissipation and employs fanless design which is absolutely quiet to use. You can turn on the server for 24 hours and the server will not generate any noise to disturb your work or rest.
- Small-sized, occupies small space only. It is easy for you to place it anywhere.
How to set up a small office data center by Turbo Station?
- Set up Turbo Station in a few simple steps
- Install a hard disk to Turbo Station and finish initialization according to the Quick Installation Guide.
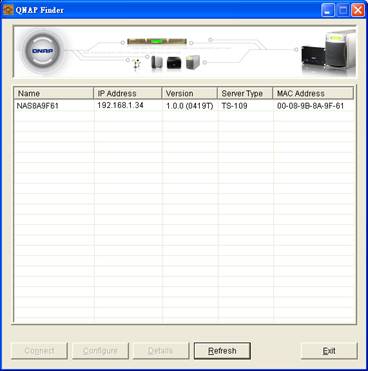
- Make sure you have connected a PC and Turbo Station to the same LAN. Execute QNAP Finder (the configuration utility provided by QNAP) to find your QNAP Turbo Station in LAN to enter Turbo Station’s web administration page.
The server will pop up a window and prompt for user name and password. (TS-109 and TS-209’s default user name: admin, password: admin).
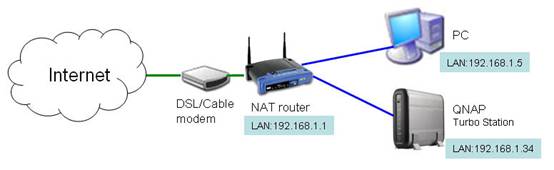
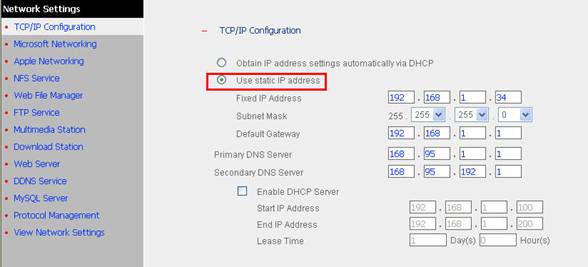
- It is recommended to assign a fixed IP to Turbo Station. (Since you may need to open the ports of some services on your NAT router and forward them to the fixed IP address of Turbo Station.) Go to Network Settings>TCP/IP Configuration. If your gateway address is 192.168.1.1, you can assign a fixed IP to Turbo Station, e.g. 192.168.1.34, and set the subnet mask as 255.255.255.0. Note that the LAN IP of Turbo Station should be in the same LAN of the NAT router.
B. Setting up a file server manually
Step-by-step configuration:
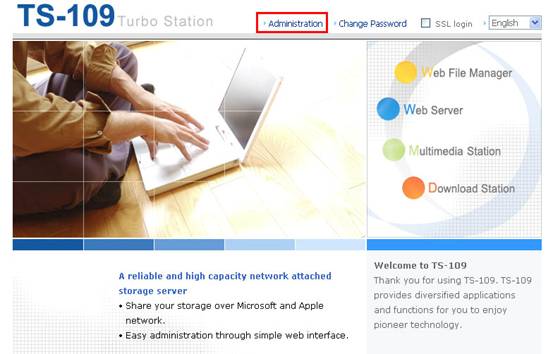
- Enter the administration page of Turbo Station:
- Click Administration to enter the administration page.
- Enable Web File Manager
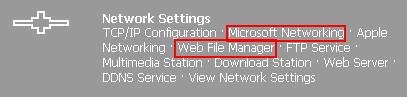
- Go to Web File Manager page in Network Settings.
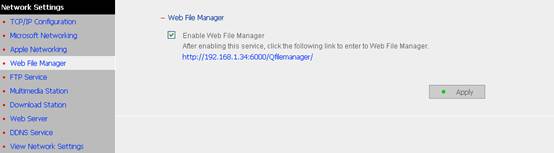
- Check the box “Enable Web File Manager” and click Apply. After successful activation, you can access the data via web browser by the link http://Turbo Station IP:8080/Qfilemanager/.
- Enable Microsoft Networking
- Go to Microsoft Networking in Network Settings.
- Check the option “Enable file service for Microsoft Network” and click Apply. You can then access the data in Windows OS.
- If there are Apple users, you can enable Apple Talk file service in Apple Networking page.
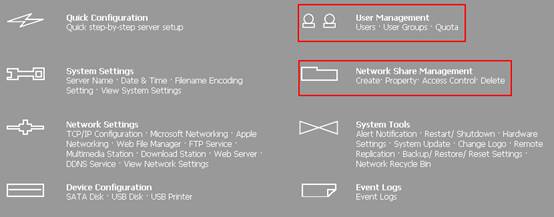
- Create users, user groups, network share folders and assign the folder access right
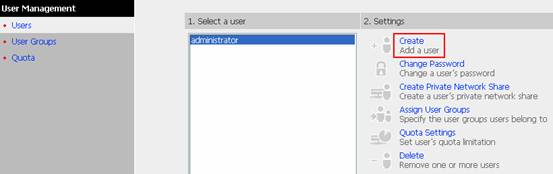
- After logging in the administration page, you can go to User Management and create user groups, add or delete users, and change the login password. You can also create particular network shares for each user.
- You can go to Network Share Management to create a share folder and define the folder access right (including full access, read only and deny access).
- Example:
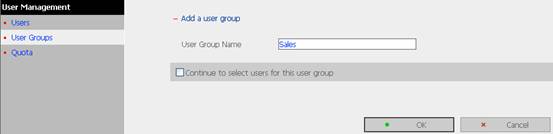
In User Management, click User Groups on the left. Then select Create. Add a user group “Sales”.

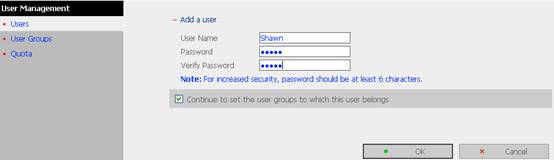
Add a user “Shawn” and enter the password for Shawn.
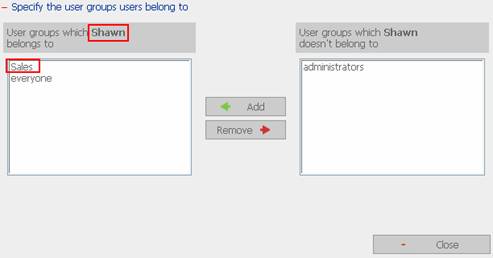
Add Shawn to the user group Sales.
You will find that all these configurations can be done via web browser.
- When the above account and folder settings are completed, you can send an e-mail to inform every user to use the file server.
- Inform users to change password:
<1> Inform everyone the http link of Turbo Station administration page by e-mail, e.g. http://192.168.1.34:8080/
<2> The users can click “Change Password” on the administration page and configure their own password.
- Everyone can add their own network drive
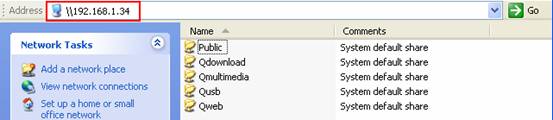
<1> You can tell every user the LAN IP of Turbo Station e.g.\\192.168.1.34 (note that back slash should be used). They can add and open the network drive in My Network Places or enter the link in web browser to access the network folders you share on Turbo Station.
<2> Everyone can select their own folder, right click the folder and select “Map Network Drive”.
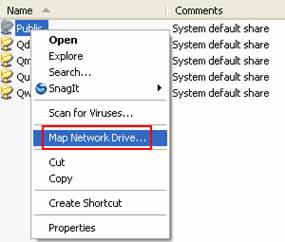
<3> Select a drive letter for the network share. Enter the password to access the folder.

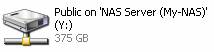
After mapping the network drive, the network share will appear in My Computer (as shown below). You can drag and drop, or copy and paste to upload and download the data.
- By now you have set up your own file server. Everyone can have their personal and group network shares for file backup and sharing.
C. Set up backup mechanism for everyone
Turbo Station provides a powerful Windows backup software NetBak Replicator for you to back up important data on computer to the network shares on Turbo Station. Other users can download this software on their computers to use its powerful backup functions.
Create schedule backup
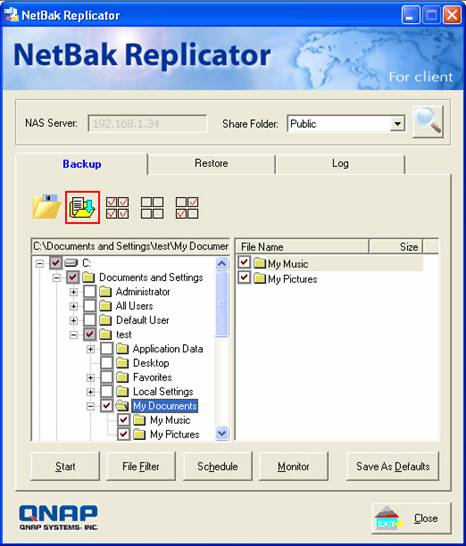
(1) Select backup files
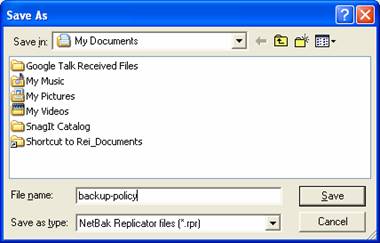
Select the important files you want to back up, e.g. email, contacts, PowerPoint and click “Save Configuration File” button ![]() to save your backup settings as an rpr file. The rpr file will record the backup directories. When you need to back up next time, you can simply load the rpr file to apply the same backup settings.
to save your backup settings as an rpr file. The rpr file will record the backup directories. When you need to back up next time, you can simply load the rpr file to apply the same backup settings.
-
-
- To execute backup, click “Start”. The selected files will be backed up to the specified folders on Turbo Station immediately.
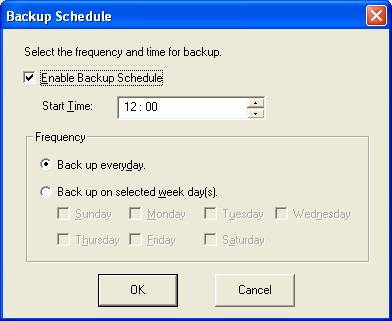
- You can create your schedule backup, e.g. 12:00 daily to let NetBak Replicator back up data automatically.
-
Powerful Auto-Sync (Real-time) Backup
Once you click the “Monitor” button, the Netbak Replicator will monitor all the changes (newly created, deleted, or modified files) of your defined backup source on your PC. It will automatically back up all the changes from your PC to the destination folder on your Turbo Station over the network.
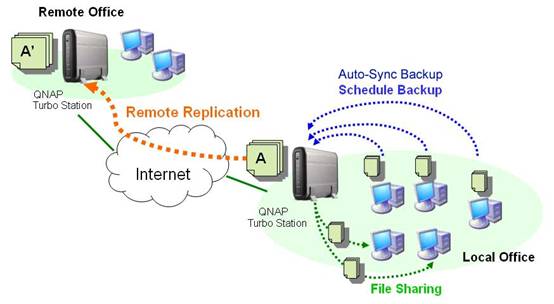
D. Enhanced security! Easy remote data replication setup
“Remote replication” may seem to be a mechanism which is only affordable by IT professionals and large amount of investment. However, with Turbo Station, you can back up data by remote replication-a powerful embedded function of Turbo Station. There is no need to install any software. You can set up remote replication easily by web browser.
- First, you have to create a network share on a remote Turbo Station for local Turbo Station backup. In this example, we created a folder RD1 in Office network share on a remote Turbo Station to back up the data on another Turbo Station. The login information is user01:12345.
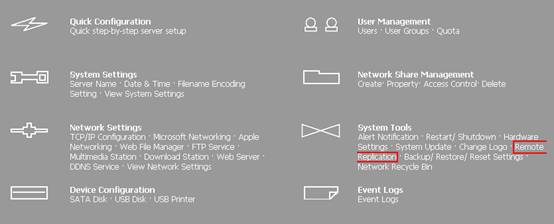
- Configure remote replication on local Turbo Station. Go to System Tools and select Remote Replication.
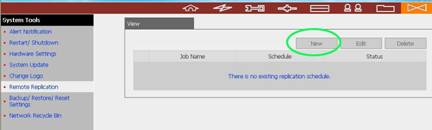
- Click New to create a new replication job. You can create different jobs to back up different data to different network shares on Turbo Station.
- Enter the destination folder and login information, e.g. Office/RD1, user name: user01, password: 12345). The user name and password must be valid to login the remote Turbo Station. Then select the backup schedule, e.g. daily, weekly and the time. Turbo Station will execute remote replication according to the schedule. Click OK to save the settings.
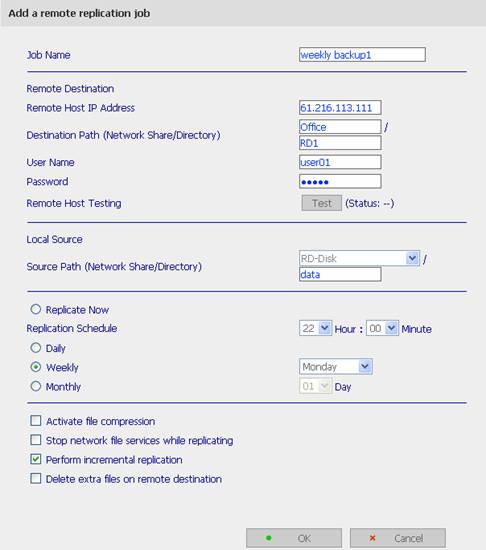
- Turbo Station will back up the data to remote Turbo Station according to your schedule for enhanced data protection. Turbo Station lets you enjoy the value-plus and advanced enterprise functions!
Note that to back up the data on Turbo Station to a remote Turbo Station from WAN and if the local Turbo Station is placed behind a NAT router, please forward the port 873(Rsync port), port 445, and port 137~139 (Samba port for authentication) to the local Turbo Station.
Conclusion
QNAP Turbo Station supports many valuable software functions like File Server, Backup Server, FTP Server, Web Server and remote replication to satisfy the need of SOHO and small business users. Lots of advanced and complicated functions which could only be done by IT professionals before can now be easily done by web browser. As a small-sized enterprise server, Turbo Station helps save the installation and labor cost. All the functions can be directly enabled without any extra software. It is absolutely convenient.
Moreover, Turbo Station is small and can be placed anywhere in the office. There is no need to set up a particular server room. The unique fanless design and aluminum case for heat dissipation enable absolutely silent and stable performance. There is no fan noise to disturb your work. Turbo Station is more energy-saving compared to PC server. It consumes only 15~25W, approximate to the consumption of an energy-saving bulb. It is appropriate to run 24×7, stable and cost-saving. All in all, Turbo Station is an ideal choice for SOHO and small-sized companies. No matter schools, clinics, sales lodgment, small companies and departments of 5~20 people in an enterprise can all use Turbo Station as their file server